Deploy SSG Create React App in IIS
Recently we had to create a new website for one of our clients. We, TEC: Digital Agency, are new at building react apps so we decided to use the default react template from .NET that is built using the create react app (CRA) template.
The development process went smoothly and we reached our deadline a couple of weeks ahead of time when we got a new bug from our QA team. The bug stated that only the meta tags from the front page were being served to the crawlers and implicitly to any social media site. This affected SEO and the visibility of the site.
After some investigation we arrived at the conclusion that React (create react app), being a Single Page Application, is pretty bad at SEO and in order to improve it we had to implement Static Site Generation(SSG) or Server Side Rendering(SSR).
After another couple of days we realized that because we deployed our site using the .NET Publish action SSR would be difficult to implement, at least at this point in the lifecycle of the app. Our only fix for this issue remains SSG. Fortunate enough it was fairly easy to add SSG through react-snap, install the library, add the changes to index.js and run the “react-snap” after the build command and get the entire site. The hard part was the way the app was deployed, being a .NET app we published the site and deployed the result on an IIS server. The .NET app would serve our front end from the “ClientApp” folder, but it would not serve the app using SSG.
After another couple of days of investigation, and thanks to the YouTube clip found at [1] we realized that we had to deploy the app using IISNODE, on an express server in IIS. This way the express server would serve our app in an SSG manner.
The entire solution can be cloned from this github repo.
In the next part of the article, I would like to describe the steps necessary for deploying a create react app SPA in IIS with IISNODE and express. We will be using yarn, so you need to have installed node (latest version) and yarn.
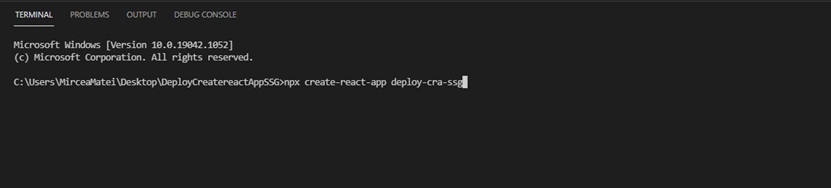
- First step is to create a react app using CRA, choose a desired location on the disk and run
- “npx create-react-app deploy-cra-ssg”
- After the app is created we will install some libraries that will help build the app
- Install material ui
- yarn add @material-ui/core
- yarn add @material-ui/icons
- Install react router
- yarn add react-router
- yarn add react-router-dom
- Install react-snap
- yarn add react-snap
- We will be using eslint so please install the next libraries
- yarn add eslint
- yarn add eslint-config-airbnb
- yarn add eslint-plugin-import
- yarn add eslint-plugin-jsx-a11y
- yarn add eslint-plugin-react
- yarn add eslint-plugin-react-hooks
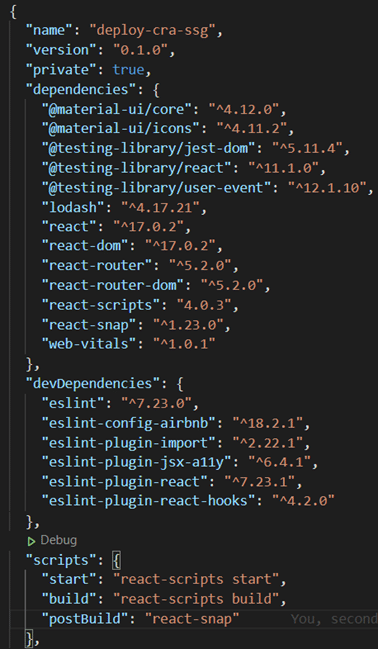
- Our dependencies from package.json
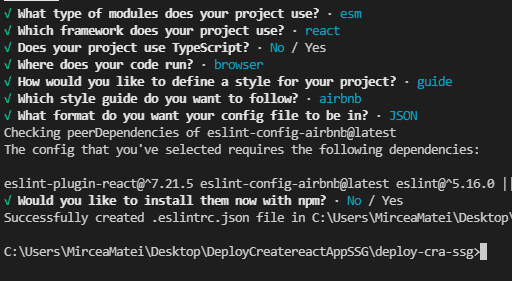
- Run “eslint –init”
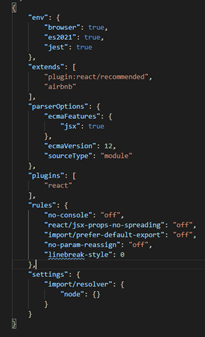
- This is how our “.eslintrc.json” file looks like
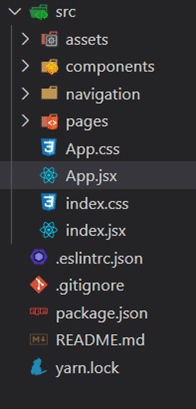
We will be implementing react-router in order to create some pages so that react-snap can crawl and generate static data. The next image will show how our src folder looks like.
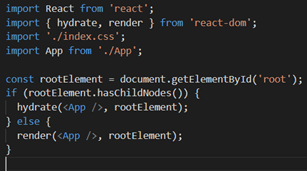
Next step is to reimplement the code from “index.jsx” so that it uses hydrate and render as the react-snap documentation [2] suggests.
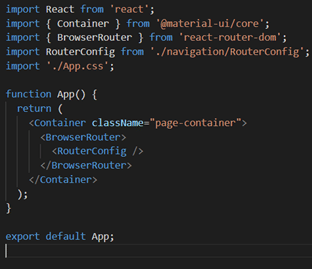
Next in the “App.jsx” file is to implement the “BrowserRouter”
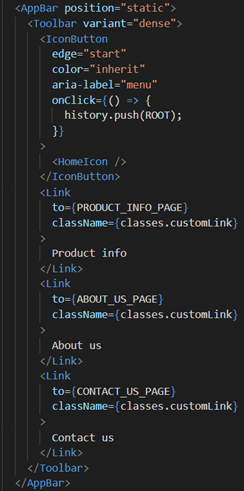
The “RouterConfig.jsx” from the navigation folder file contains all our routes as can be seen in the image bellow.
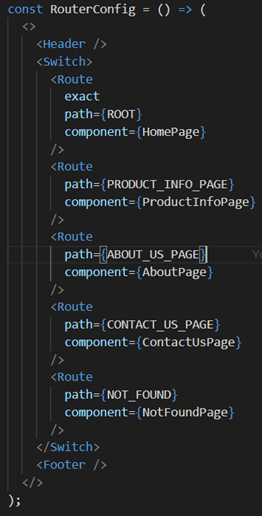
The HomePage, ProductInfoPage, AboutPage and ContactUsPage are simple pages that contain enough data in order to allow us to differentiate them.
After building the Router and all the routes, react-snap will need some links to crawl through so we build a “Header.jsx” file that will contain all the links on our site. It is important to have the links so that react-snap can crawl through them and build the static pages.
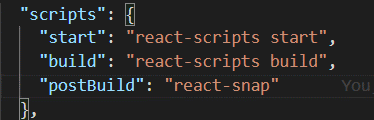
Now that we have the app set up, and the router with the mentioned pages we can build the app and run “react-snap”. In “package.json” file we will add a “postBuild” command as seen in the image bellow.
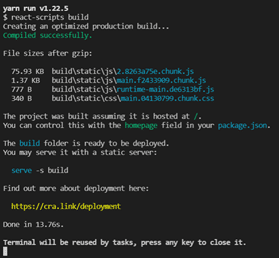
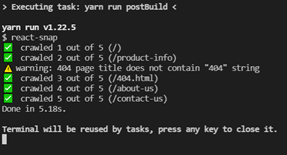
Run the “build” command and afterwards run the “postBuild” command. When running the “postBuild” command make sure all your routes are being crawled.
After these commands are executed the app will be built and all the files are in the “build” folder.
The React part is over, now we move over to the second part of the article, deploying to IIS. This will present a deploy on a local server in IIS, but the server and web.config file will work on a production server of IIS as well. When deploying on production make sure all folders have the correct permissions otherwise the server will not be able to access your files.
First things first, so make sure that you have the following in place:
- IIS is enabled on your device [3],
- Need to install URL Rewrite [4] and
- Need to install IISNode [5]
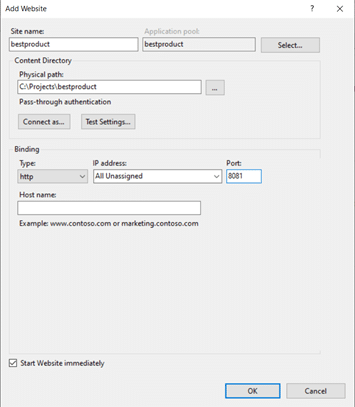
After these steps are done we need to go in IIS and create a new website and do not forget to add the new site to the hosts file.
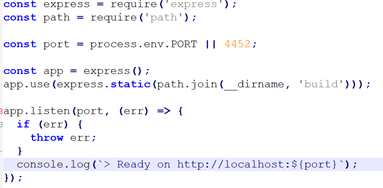
Now that the site is created go to the folder chosen for the site in the previous step and add a server.js file [6]. In the image bellow you can see our server.js file, its pretty basic but you can customize the server file using the examples from [6].
Next step is to add the “web.config” file [7], the same file used by [1]. The “web.config “file can be customized and changed as necessary, in [1] a nextJs app is deployed on the server and not a CRA app.
After the “server.js” and “web.config” files are configured we can add the build folder created in the previous section. The problem is that now when you go to the web site, you see the next error.
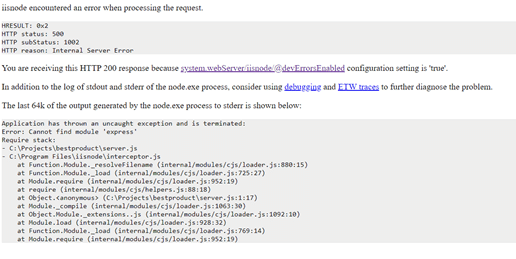
Unfortunately, the server.js file cannot reach the express library installed, even if it is installed globally. So in the next steps, we need to install “express” and “path” and any other libraries that server.js uses locally in the IIS folder. Don’t forget that you can customize the “web.config” file to remove the “node_modules” folder.
Run the next commands
- npm install express
- npm install path
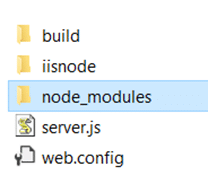
Now your site should be up and running and your IIS folder should look like this (notice the iisnode and node_modules folders):
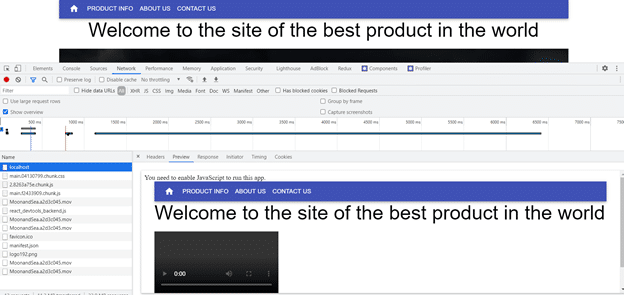
Bellow you can see the deployed website and the result of the first network call.
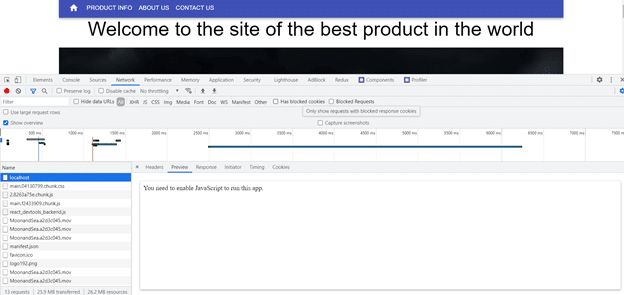
This is how the deploy looks if we do not execute the “postBuild” command:
Bibliography/References:
- https://www.youtube.com/watch?v=HLsx0iraA-Y&ab_channel=ArdiNasiri
- https://www.npmjs.com/package/react-snap
- https://enterprise.arcgis.com/en/web-adaptor/latest/install/iis/enable-iis-10-components-server.htm
- https://www.iis.net/downloads/microsoft/url-rewrite
- https://dotnet.libhunt.com/iisnode-alternatives
- https://expressjs.com/en/starter/examples.html
- https://github.com/MRCollective/nextjs-server-azuresiteextension/blob/master/Next.js/files/web.config
Mircea MATEI Software Engineer