Building a basic search engine
In this article we’re going to talk about building a basic search engine, with all its layers, using Elasticsearch indices for data storage, WebApi for exposing the data and an Angular web client for searching and displaying the results.

Elasticsearch
Elasticsearch, one of the most widely used search engines, is currently at number 8 (at the time of writing this article) in the DB-Engines ranking (https://db-engines.com/en/ranking). It is a highly scalable open-source full-text search and analytics engine, that can be hosted in the Cloud or on-premise. It allows the user:
- to store data, in a document-based format;
- to search against different queries;
- to analyze large amounts of data in near real-time.
Elasticsearch provides a full-text search engine with an overlaying REST interface (based on HTTP verbs) and a schema-free JSON documents.
Besides Elasticsearch search engine, the Elastic team (the company that builds Elasticsearch) also provides additional apps used for various data operations, monitoring or security. One of the most notable apps is Kibana, a visualization tool that also lets the user run complex queries, track query load and extract meaningful information about the data.
We’re not going into details regarding the other two technologies that are going to be used for building the Search Engine App.
The app
We’re going to build an app/search page for football players. The user will be able to search players by their name or by their team name. The rest of the article will contain a step-by-step explanation on how to configure and integrate the main parts (the Elasticsearch index, the API and the Angular client) and also relevant code fragments.
- The first step is to download and setup Elasticsearch with Kibana.
- The search engine can be downloaded from https://www.elastic.co/downloads/elasticsearch. Usually, I install the engine as a Windows service by opening a Command Prompt window, going to the bin folder, from the extraction location, running elasticsearch-service install and then checking that the service is started. In order to check that the installation succeeded, open a browser and enter the link: localhost:9200. If a page containing “tagline: You Know, for Search!” is displayed, it means the search engine is working.
- The second step is to download Kibana (https://www.elastic.co/downloads/kibana). After extracting the zip content, go to the extraction location’s bin folder and run the following command: kibana.bat. If that worked, the link: localhost:5601 should display the Kibana UI.
- After making sure that Kibana works with the Elasticsearch server, it’s time to setup up our index. The application will rely on an index (the equivalent of a SQL database) that will contain a single type (the equivalent of a SQL table) with the players data (player’s name, team name, birthdate and a generic playing score). In order to build the index, we will run the following query:
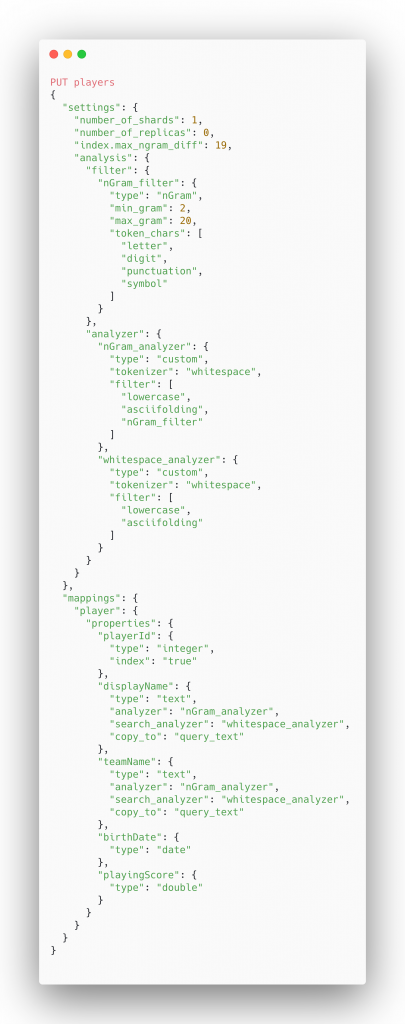
The main thing to note here is the n-gram filter section of the query. N-gram basically refers to a contiguous sequence of n items from a given text and it’s important because the user will search a certain player by name/team name, by only entering a few letters, in the search field. A n-gram must be provided with two parameters: a min value and a max value, referring to the size of the text that will be extracted from the player’s name and team name.
For example, a n-gram(2,4) applied to “Lionel Messi” will result in n-gram of 2 (li, io, on, ne, el, l_, _m, me…), n-grams of 3 (lio, ion, one, nel, el_, l_m, _me,….) and n-grams of 4 (lion, ione, onel, nel_, el_m, l_me,…..). After extracting the n-grams, Elasticsearch uses them to build an inverted index, which is basically a mapping between terms (the n-grams in our case) and which documents contain those terms.
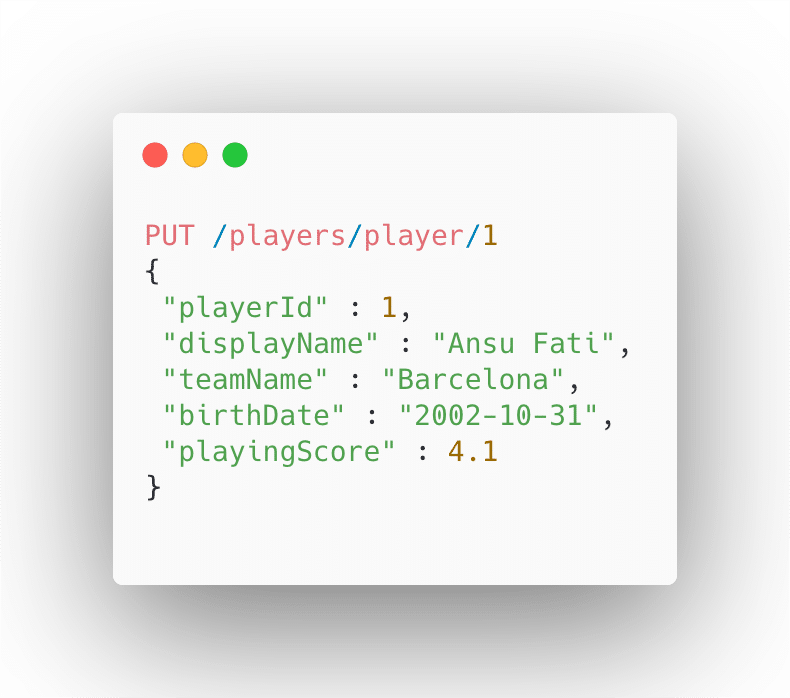
The index once created, we can start adding actual player data, by using a PUT command as follows:
Once we’ve built the players index, it’s time to continue with the API implementation.
2. The API will be built using WebApi, but WebApi with .NET Core can be used as well.
- First, we’ll have to create a new WebApi project and bring in the Elasticsearch Nuget packages:
Elasticsearch.Net (https://www.nuget.org/packages/Elasticsearch.Net/)
NEST (https://www.nuget.org/packages/NEST/)
- After the dependencies are added, we can start implementing the repository that handles the term lookup in the Elasticsearch database. We will add an interface (SearchRepository) that contains a single lookup method.
The constructor will contain relevant connection details, like the server’s URI and the default index.
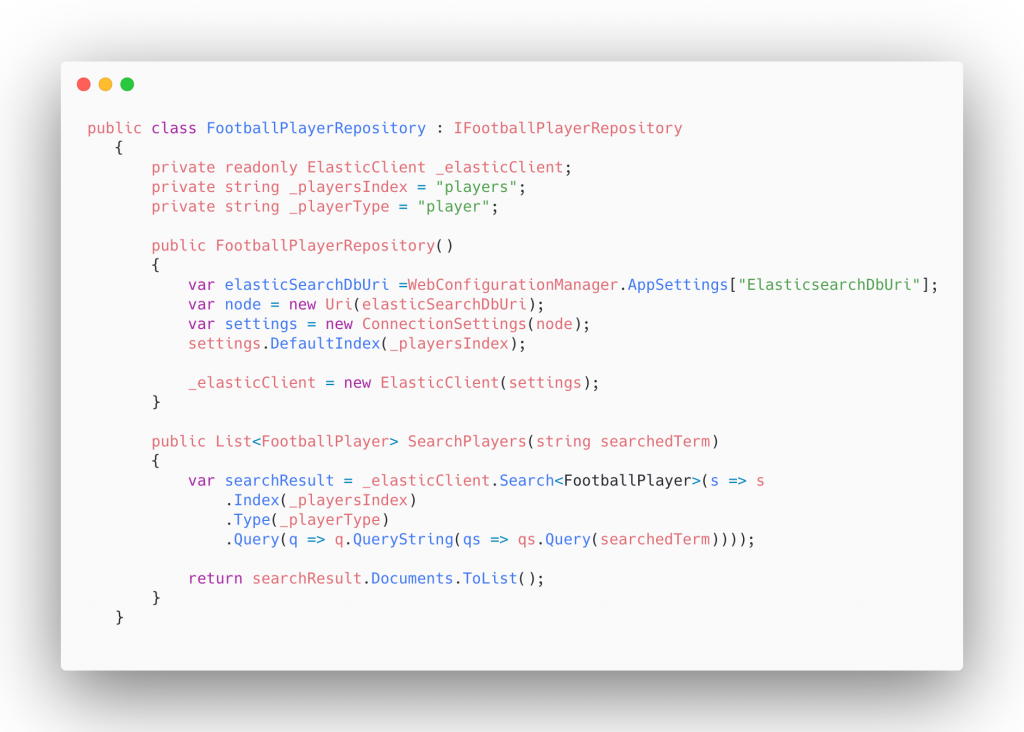
- The next step would be to create a new API controller and use the repository that we’ve just created. Although it’s not a best practice and we could have created a service for the business logic and inject it in the controller, by using an IOC container – it’s not in the scope of this article.
Once we’ve created the API, it’s time to start building the web client.
3. The web client will be built in Angular (version 7) and will consume the API endpoint implemented at step 2.
- The first step is to set up the Angular solution by creating the main module and add the main component to it. I will not cover all the steps involved in building an Angular web client. We will also need to install node with npm for integrating third-party libraries.
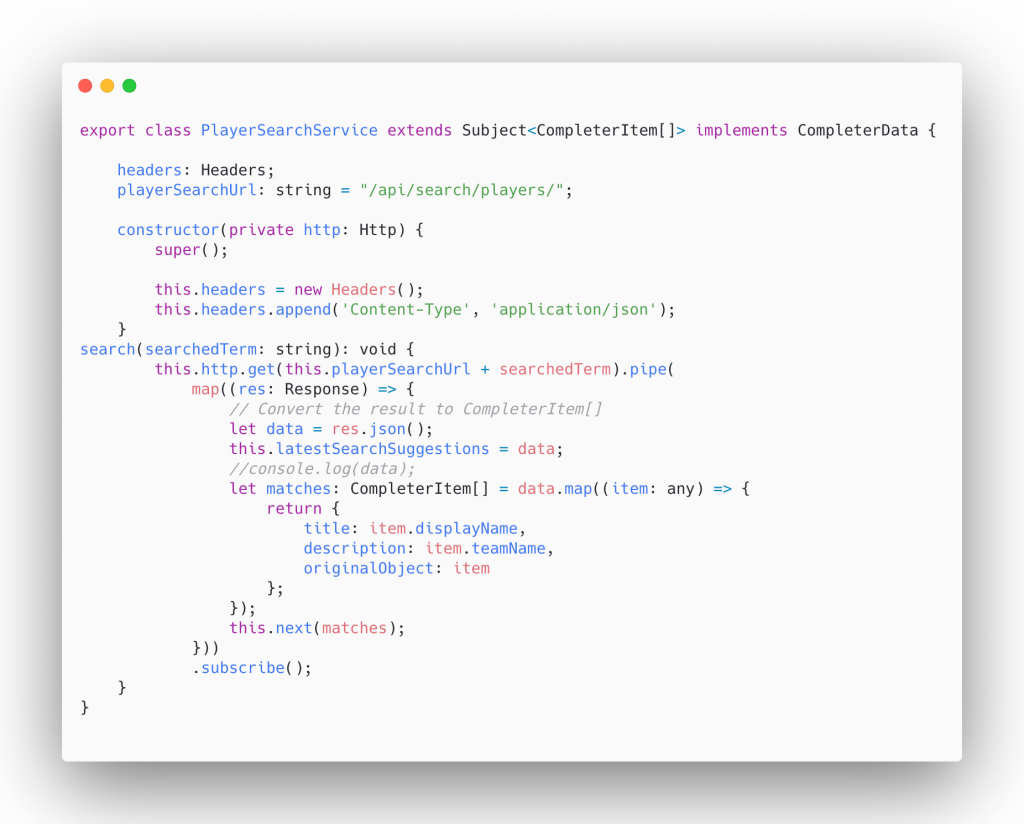
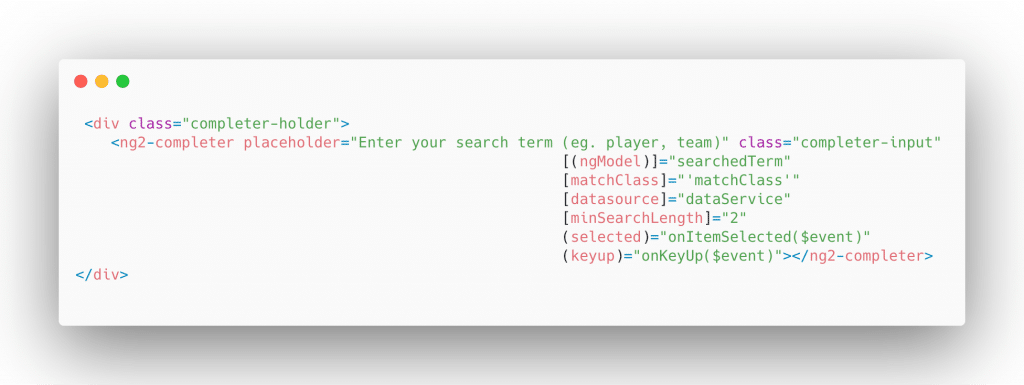
- For searching, we’ll bring in an autocomplete control called: ng2-completer (but you can use another one) using npm.
- We also need to implement a service that will make the API calls. The service will contain a GET method that will pass the searched term and will wait for the response, in the form of a CompleterItem (ng2-completer specific result class) collection. For this to work, the service must extend Subject<CompleterItem[]> and to implement CompleterData.
- Next, we will add the search component that will contain the ng2-completer’s search field. The service that we’ve created previously, will be injected and used directly by the ng2-completer. Additional events, like (selected) or (keyup) can be handled.
Finally, if it all went well, the user should be able to see a list of suggested players when he performs a search (by player’s name or by the player’s team name). And with a little bit of styling the result should look like:

Sebastian Farcas Software Engineer